TO PAY FOR THE TUTORIAL: send 15USD to [email protected] PayPal address.
_____________
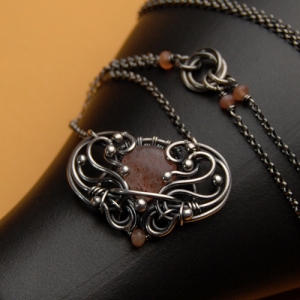
I present to you one of my most treasured designs - I have created a lot of pendants AND earrings with this idea and they have always been my customers' favorites, too.
This is by far my most detailed tutorial, ing the secrets of my layered designs many of you asked about!
The process of making of this pendant is presented in 60 easy to follow steps and illustrated with 73 high quality pictures. It will be sent to you via email as a pdf copy (about 6,8 MB), usually within 24 hours receiving the payment (except weekends and holidays when I'm out of my studio).
EXTRA: With this tutorial you will also get useful information about my choices of wire (fine silver vs. sterling silver) and tips on how to make balled ends with a torch - all illustrated with additional 5 pictures.
IMPORTANT: The lesson explains how to make the pendant presented on the cover (first picture) of this listing. Other pictures present designs you can make using the technique learned this tutorial and are not explained in the lesson.
NOTE: all measurements are given in centimeters (cm).
KNOWLEDGE REQUIREMENTS:
- basic wire wrapping and weaving techniques, including creating wire and bead connectors, opening and closing of jump-rings.
- the technique presented in my CROSS tutorial - making beaded joints as presented at the ends of cross's arms.
TOOLS AND MATERIALS:
- one heart-shaped briolette measuring ca 1cm by 1cm (mine was slightly bigger - 1,1cm by 1,1cm), top drilled;
- two rondelles drilled through with holes large enough for a 21 gauge wire;
- about 55cm of 1mm / 18 gauge fine silver wire (in 4 pieces of 20cm, 16cm, 10cm, 8cm);
- about 20cm of 0,6mm / 22 gauge fine silver wire (one piece);
- about 80cm of 0,4mm / 26 gauge fine silver wire (in two pieces of 50cm and 30cm);
- about 30cm of 0,25mm / 30 gauge sterling silver wire (in 3 pieces, 10cm each);
- about 10cm of fine sterling silver chain (in 2 pieces, 5cm each);
- several jump-rings (mine were 4cm in diameter, 20 gauge wire);
- two 2mm silver beads with a hole;
- torch (chef's torch is fine enough for our purposes), water to quench the wire;
- flat nose pliers;
- wire cutters;
- round nose pliers;
- ruler and pencil or marker pen;
- several round objects for wire shaping (can be pens, markers, etc. of several diameters);
- fine file and abrasive paper;
- larger sewing needle;
- liver of sulfur (optional).
NOTE: if you want to make a pair of earrings, you need to double the bead amount and wire lengths.
If you have any questions concerning this tutorial, please, do not hesitate to contact me.
TO PAY FOR THE TUTORIAL: send 15USD to [email protected] PayPal address.
|