TO PAY FOR THE TUTORIAL: send 15USD to iza@izamalczyk.com PayPal address.
_____________
In the previous tutorial on Gemini Earrings I talked about symmetry and techniques that allow us to create identical wire-wrapped elements. And although many of you might find this a true challenge, I say it's much easier than creating a piece expressing the perfect chaos.
In this tutorial I will present step by step instructions for creation of the Magical Pendant. I'll also share my experiences concerning balancing freeform, asymmetrical designs, as well as offer some trouble-shooting advice. Moreover, you'll also learn how to make my signature swirly clasp and, finally, I'll you a simple trick of wire tail wagging, which solves the problem of cutting and tucking wire ends while wrapping ;)
The process of making of this pendant is presented in 80 easy to follow steps and illustrated with 86 high quality large pictures. The file size is 7,6MB.
The Introduction file (1MB) consists of 8 pages illustrated with full color pictures as well. The whole tutorial is 38 pages filled with my experience and knowledge ;)
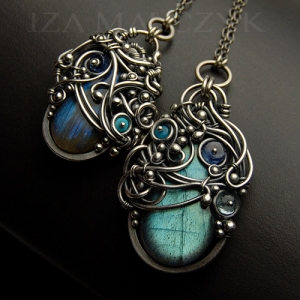
IMPORTANT: The lesson explains how to make the pendant presented on the cover (first picture) of this listing. Other pictures present designs you can make developing the techniques learned this tutorial and are not explained in the lesson.
NOTE: all measurements are given in centimeters (cm).
KNOWLEGDE REQUIREMENTS FOR THIS PROJECT:
- basic soldering skills - soldering silver frames, balling ends of wire.
- basic to intermediate wire-wrapping skills
TOOLS AND MATERIALS:
- one flat briolette measuring approximately 22mm in length and 15mm in width, drilled side- to-side at the top;
- 6-7 rondelles of different diameters (mine were 3-5 mm), complementing the color of the main stone, 3 for pendant, 3-4 to adorn the chain - with holes large enough for 24 gauge (0,5 mm) wire;
- 8 cm of sterling silver wire - 15 gauge (1,5 mm) (for the frame);
- ca. 21 cm + 9 cm of fine silver wire - 18 gauge (1,0 mm) (swirls and clasp);
- ca. 18 cm of fine silver wire - 19 gauge (0,9 mm);
- ca. 23 cm of fine silver wire - 20 gauge (0,8 mm);
- ca. 20 cm of fine silver wire - 23 gauge (0,6 mm);
- ca. 20 cm of fine silver wire - 24 gauge (0,5 mm);
- ca. 50 cm of fine silver wire - 26 gauge (0,4 mm) (for wrapping);
- chain of your choice and length, to hang the pendant on + wire to add beads to the chain;
- several jump-rings to attach the bail and chain;
- flat nose pliers, round nose pliers, chain nose pliers, wire cutters, nylon jaw pliers or magic tool, sewing needle, hammer and steel block;
- tools and materials required for soldering (torch, solder, pickle, etc.);
- round objects, like a larger marker pen, for shaping frame and clasp;
- files and abrasive papers of different gradation;
- (optional, although highly recommended) - liver of sulfur or black patina, steel wool + polishing tumbler
The finished pendant will be ca. 4 cm long, including the top jump-ring bail, and 2,5 cm wide.
If you have any questions concerning this tutorial, please, do not hesitate to contact me.
|